Wednesday, 17 July 2013

A cake decorators toolkit


I'm often asked how I manage to achieve particular features of my cakes and my answer is invariably that there is a tool for the job! Here's my top items in my cake decorators toolkit:

1) Icing smoothers


Icing smoothers

I absolutely couldn't get by without these! They help hide a multitude of sins. After applying marzipan to the cake I use these to push the sponge into as regular shape as possible and you can actually be quite brutal at this stage to force the cake into a more even cube/cylinder. Then after applying the icing these are used to remove any lumps and bumps and literally polish to a really smooth finish.

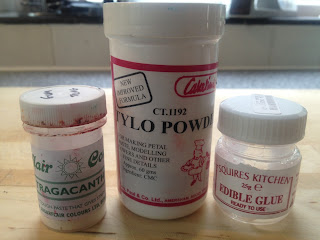
2) Tylo (CMC) or Gum Tragacanth and icing glue


CMS, Gum Tragacanth and edible glue


Not strictly a tool but an invaluable part of my arsenal nonetheless. The addition of a small amount of either of these powdered gums will transform regular icing sugarpaste into something that will hold its shape when modelled, not get too sticky, and allow you to roll it extremely thinly. You can also buy ready mixed modelling paste but I really don't see the value when you can so easily make it yourself. 

Icing glue is simply a hydrated version of CMC and I use a fine brush to stick items together in most of my designs.


Sunday, 14 July 2013

Bunting cake

Bunting cake

Nothing says "summer party!" quite like bunting. Well except maybe Pimms. And a barbecue. But that still makes it the first, second, third most important part of a summer party so I thought it would be a fabulous theme for a cake I was baking for a family summer party this weekend.

Our young cousins from New Zealand were visiting the family and everyone would be getting together so I wanted to make something quite fun. It was also really important that I could easily transport the cake on the train from London up to Yorkshire - a squashed cake is soooo not a good look - so it had to be single tier without too many fragile components.

I'd already pinned this FABULOUS bunting cake on Pinterest so borrowed heavily from it for this design. I was a bit reluctant to make yet another pink cake but I already had this sensational spotty ribbon that really complemented the patterns and made pink the obvious choice.

There was actually a reasonable amount of maths involved in the design. I made sure the bunting tessellated so I could make it efficiently. It then follows a visually appealing sequence of colours (blue, purple, green, blue...) and designs (spots, stripes, spots...) 

Making sugarpaste bunting

The bunting itself is, as always for me, make with regular supermarket sugarpaste with added Tylo powder that allows you to manipulate it really easily - in this case giving the ability to roll is extremely thinly. It was then simply stuck to the cake with edible glue.

Making sugarpaste bunting

After I got to the party I added the hanging string of bunting. To make this I had stuck triangles together with some paper coated sugar floristry wire between. It was then hung between a couple of cake pop sticks.

Layers of cake


Sunday, 19 May 2013

Mr Bump

Mr bump cake
I've been wanting to make a this cake for a while so when a slightly accident prone friend, with a thing for Mr Bump celebrated his birthday I jumped at the chance to give it a go!


At its heart this is a simple 6" sponge cake but the difficult part was making the limbs which were carved out of another cake. The trick was to chill the cake down to make it more solid before carving. I then added a layer of butter cream and chilled again.


When the limbs were properly solid then covering the limbs with marzipan and sugarpaste was quite straightforward.

Just to prove there really was cake inside!
The bandages were made from sugarpaste with added CMC to allow the paste to be rolled really thin for this nice layered effect. 

I'm quite proud of this cake. It was quite tasty too - even if I do say so myself!

Sunday, 10 March 2013

The music man

Piano and piano cake
Can you keep a secret? Sssshh. Come closer and I'll tell you; the Wee Greenwich Bakery isn't in Greenwich anymore! 

Much as we loved our wee Greenwich flat we had outgrown it and longed for outside space and more room to keep all our cookbooks and cake tins. Mr. M wanted a piano and a vegetable garden and I wanted a rabbit so we moved out of London and into a little house last year.

Well this week Mr. M finally got his piano. It was partially a birthday present and partially paid for with some kind wedding present money that we'd set aside for something really special.

To celebrate the occasion I also baked him a piano themed birthday cake. It was all a bit of a rush - I had about three hours after getting home from work to bake and ice the cake from scratch for Stuart to take to work the next day. This certainly isn't my best decoration ever but not bad for an evening's work! The cake was much appreciated and was apparently very delicious :)

Piano cake

Thursday, 14 February 2013

Happy Valentine's Day!

Blueberry muffins for valentine's day

Happy Valentine's Day from the Wee Greenwich Bakery! These Blueberry Muffins from the Bouchon Bakery book made an excellent dessert served hot with some vanilla ice cream. 

The recipe recommends the batter is made the night before and it does seem that it made them extra-moist. The blueberries were frozen and coated in flour before being mixed into the batter which successfully kept them whole and suspended nicely throughout the cake. Om nom nom! 

Happy Valentine's Day one and all! xxx

Sunday, 10 February 2013

Jessica's Christening Cake


Christening cake with teddy bear

I was proud to be asked to bake a cake for our friends' baby's christening. They knew how they wanted the cake to look and gave me a couple of pictures to work from. This is the first time I've made something based on a design someone else has chosen and it was a nice challenge to work on something I wouldn't normally choose myself. I was tricky to just work from pictures without any instructions - but I think I did OK :)

Adjustable cake tin
I used my trusty adjustable cake tin that I've mentioned before. You can see in the picture to the left how it can be adjusted to make a cake of your preferred dimensions - in this case a whopping 9 inches! I was feeding a hungry bunch of Northerners after all!

Unfortunately I only have one of these tins, and even then only one would fit in our tiny oven, so I had to bake the two different layers separately. I haven't baked many large cakes in the oven of our house and didn't know there is a nasty hotspot and consequently the first tier didn't come out very evenly baked. I had to slice off quite a lot of cake to get it to sit flat so in the final cake there are only three layers instead of my usual four.

I started working on the decorations for this cake during the week so that they would be nice and dry by the time they were needed today. I used modelling paste to make the extremely cute teddy bear. He's essentially made of a ball for a body, another for a head and sausages for arms and legs. These modelling tools were great for shaping the ears, eyes and the cute seam down the middle of the head. Couldn't you just hug him? (Or bite his head off?!)

Cute pink teddy bear cake decoration with starsI also used modelling paste for the stars. I simply cut these out of paste and inserted some florists wire which is normally used for the stems of sugar flowers. Unsurprisingly modelling paste was also used for the building blocks and cut out 'JESSICA' letters.

The stars and hearts were all dusted with edible lustre to give them a nice pearlised sheen.

I'm well out of practice at royal icing lettering so I'm pleased with how well these letters came out. Next time I'll be sure that I mix up a colour that has more contrast to the icing so you can better see my handiwork.

The cake was extremely well received by all! I'm quite proud of it - even if I do say so myself :D

Now to relax and treat myself to a well deserved gin and tonic.

Sunday, 13 January 2013

Put the bacon in the scone!

Since I had an amazingly tasty bread roll that had crispy bacon bits in it at Le Manoir a few years ago I've been pretty obsessed with putting bacon in stuff to make it more delicious. Of course adding bacon will make something more delicious! You'll often hear me say "Ooooh, we should put the bacon IN the <insert name of baked goods here>!"

Cheese and bacon scones

So when we stumbled into the Bouchon Bakery at the Rockefeller Center in New York I absolutely had to try their Bacon and Cheddar Scone - and it too was amazing! "Put the bacon in the scone!"

For Christmas my husband bought me the Bouchon Bakery Cookbook. Naturally the first thing I had to bake was these bacon and cheddar scones. The recipes in this cookbook are amazingly precise; 107g plain flour, 196g self-raising flour, 8.1g baking powder... Apparently it's because they've been scaled down from the quantities that they use in the bakery. Unusually they are cooked from frozen, which is actually quite useful as I could just bake four and the rest of the batch can stay fresh in the freezer until we want some more - which is likely going to be in a day or two.

The finished scones are honestly about the most delicious savoury I've ever baked. They taste quite light considering the recipe calls for bacon, cheese, double cream, butter and creme fraiche!

Next I'm really looking forward to baking these bacon and chilli biscuits that I saw on Domestic Sluttery; put the bacon AND CHILLI in the biscuits!