Showing posts with label royal icing. Show all posts

Monday, 13 June 2016

Japanese Cherry Blossom cake

Japanese cherry blossom cake

I'm a big fan of so many things about Japanese culture and one of my favourites is the idea of a 'hanami' party to welcome spring and celebrate the blossoming of the trees. Cherry blossom (sakura) and plum blossom (ume) are just so pretty! I really hope to visit Japan in the spring and enjoy a hanami party and drink sake under the blossoms some day. Until then you may find me in the garden in spring having a wee sake by my very own cherry tree...

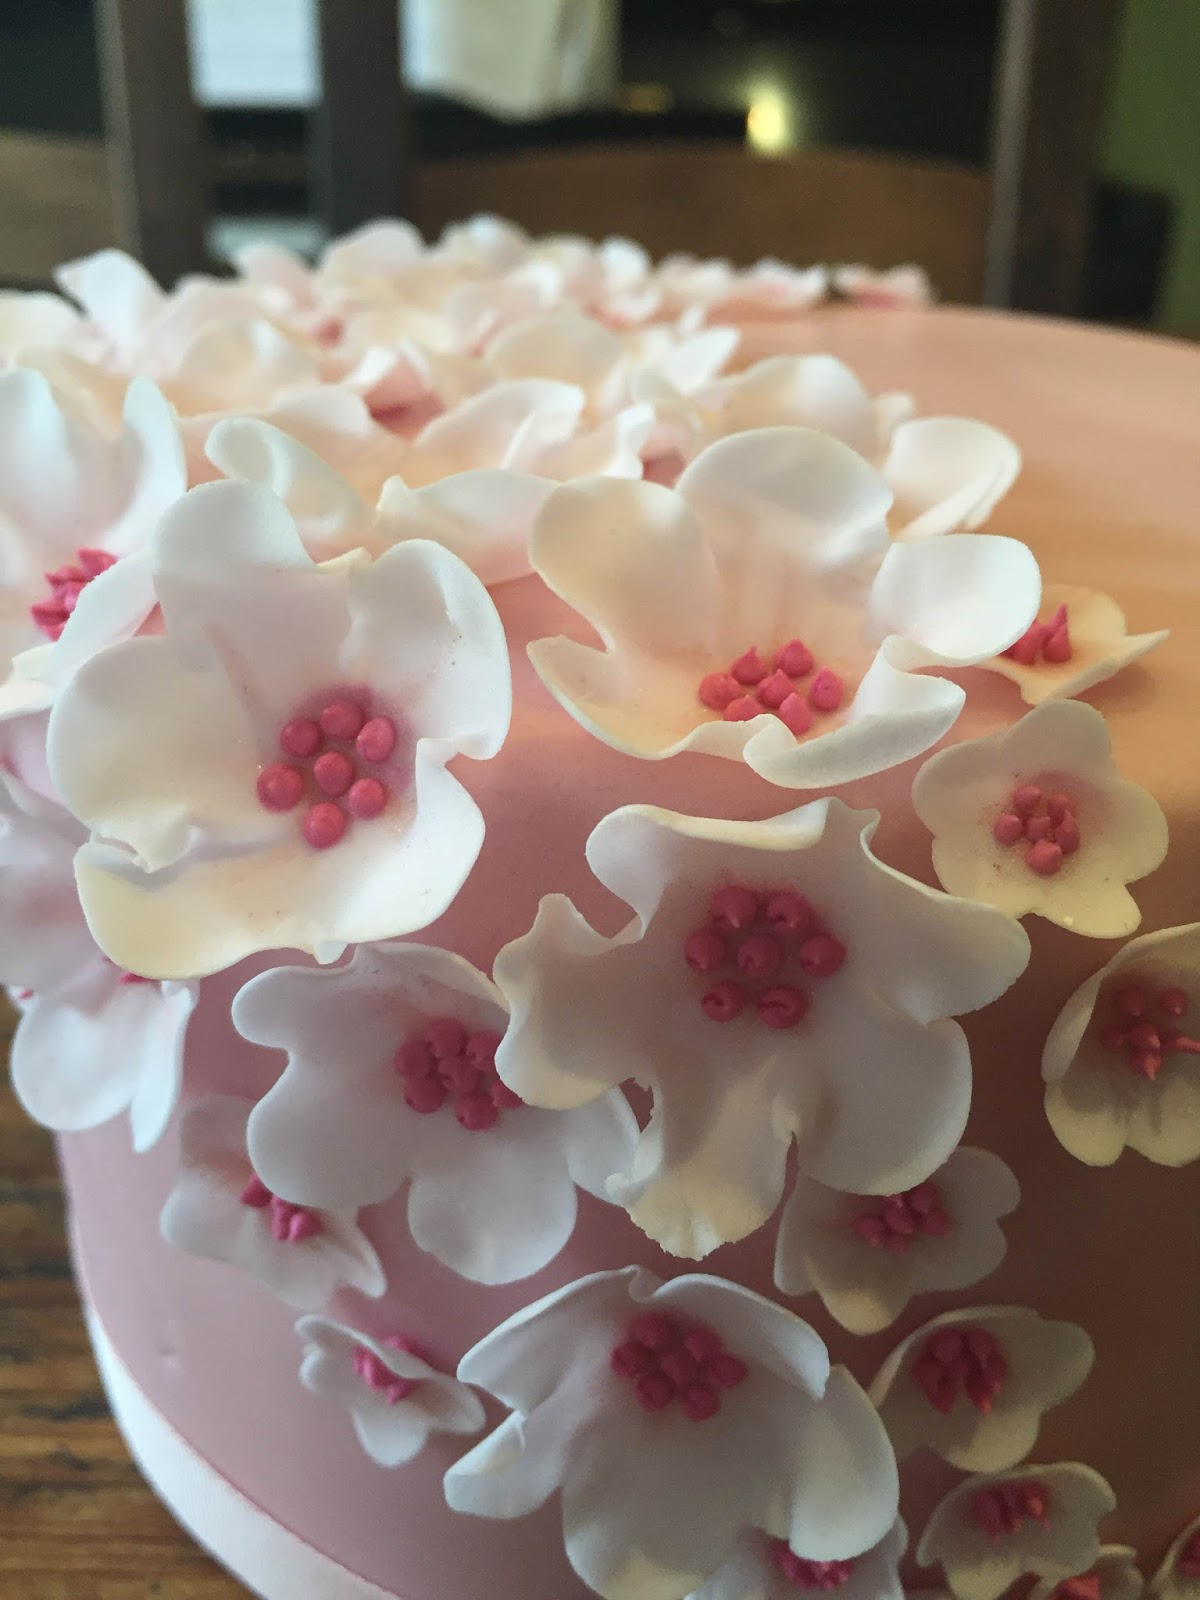
I wanted to bake a Japanese themed cake for my friend Steph who spent six months working in Japan and was lucky enough to partake in the hanami festivities. I've previously made the below blossom cake for my cake decorating certificate. This time I wanted to make something with more impressive flowers using sugar florist paste.

Japanese blossom tree icingCake with model of Japanese lady in kimono made of sugarpaste

The design is very much based on the fondant fancies in from Peggy Porschen's Cake Chic. Given how much I love blossoms I'm not sure why I've not made this before!

It's a normal 6" cake decorated with pink fondant. You can see my other blog posts here with instructions on how to bake and decorate the basic cake.

It's been quite warm and humid this week which complicated things. The buttercream was very runny and struggled to be whipped so I had to refrigerate it to firm it up. The heat also made the marzipan and icing extra pliable and easy to stretch and tear so I may resort to lightly chilling them the next time I bake in summer. I'll certainly be allowing extra time when baking when it's warm in future.

How to make japanese cherry blossoms from sugar florists paste using a sponge and ball or boning tool

The petals are made from sugar florist paste. This is an icing with added gums that mean it can be worked very, very thinly. I first rolled the paste and used a blossom cutter to cut out the simple flower shape. I then placed the blossom on a cake decorating sponge and gently thinned further using a ball tool. The tool should be rubbed over the flower evenly until it is consistently very thin and almost see-through. Finally to really flute the edges I rubbed the tool with a fairly firm pressure just over the edge. I left the flowers to shape and dry in an an artists palette that had been dusted with corn flour to prevent it sticking.

Blossoms made from sugar florists pastes drying in an artists palletDusting sugar florist paste flowers

Once dry the next stage was to give the flowers a light dusting in the centre with some dusting powder. I used a tiny brush and a small drop of claret dust which I'd lightened with some white dust for a more subtle finish.

I then made and coloured pink some royal icing which I added to a small piping bag with a tiny 'no 1' piping nozzle. I piped tiny dots of royal icing in the centre for the stamen.

Handmade sugar cherry blossom

I then piped a larger dot to the back of each flower and used that to attach the flowers to the cake. 


Sunday, 17 May 2015

Alexander's Christening Cake


This cake was a christening gift for our friends' baby Alexander. His mum had asked for a two tier blue and white cake with rocking horses, bunting and baby blocks with his name. 

I considered making a 5" and a 7" tier but that didn't seem substantial enough for the big party so I settled on a 6" and 8" tier for a truly massive cake. This is the first two tier cake that I've made since we bought a new stove. It seemed a great opportunity to try out the side oven, in which, I'd been assured by the salesperson, I could bake four tiers at the same time and they'd all cook evenly. This oven had only been used for cooking many frozen pizzas so I was certainly pleased to put it to a more worthy use. In this case I'm pleased to say that the salesperson was correct! They look a bit sunken in the picture below but I think that was more to do with me shaping the batter in this way before they were baked.

I followed all the usual processes for making each tier as I've mentioned before; slicing, layering with buttercream and jam, covering with buttercream then marzipan and then sugarpaste icing.

The letters and rocking horses are cut from a modelling paste made of sugarpaste and CMC. If there's a way to use the cutters to cleanly cut out pieces such as these then I do not know it! This time I've found that the easiest way to use them without distorting the letters is to cut each letter but not remove them from the surplus icing until they have been left to dry overnight. I then needed to use a scalpel to carefully neaten up the edges; a time consuming but ultimately rewarding task.


I fashioned a template for the bunting swathes from a piece of greaseproof paper and used a scalpel to etch a line onto which I could glue the bunting triangles and pipe the rope. I haven't practiced piping royal icing in over a year and it does show, but I'm reasonably satisfied with the overall result.

The rocking horse on top of the cake is made from two cutouts glued together only in the top half. The bottom halves were then held apart as the model dried. Finally I added a saddle made of modelling paste and piped eyes, a mane and tail.


Sunday, 5 January 2014

Tiffany Pearls Cake

Two tier Tiffany Pearls cake

I've been meaning to make this cake for ages but it's a complex one so I needed a really good reason to bake it. This week was my dear Mum's birthday so I thought it would be the perfect occasion.

The cake is based on this Peggy Porschen design from her Cake Chic book. Peggy's version is a Wedgewood blue but I've done it, more properly in my opinion, in Tiffany green by mixing some Holly Green and a touch of Navy food colouring into sugarpaste.

I wanted an impressive cake with a 7" and 5" tier but I couldn't find any 5" tins on my local high street. Any bigger would have been far too much cake for our small family party so I had to settle for 6" and 4" tiers.

Bottom tier cake with supports
A two-tier cake really needs support to stop the top-tier sinking into the bottom one. You can buy special supports for this but I already had some cake-pop sticks which I just cut down to the right height. The sticks are meant to sit about one millimetre above the top of the icing. The board for the top-tier should sit on the supports and not the cake below so as not to squash the cake and make sure the structure is stable.


I'm massively out of the habit of decorating with royal icing so I'm quite pleased with how well this has come out. I did a practice version completely free hand and learned that I just don't have the skills to do that! On the real cake, as recommended by Peggy, I scratched a straight line into the top tier and used that as a guide line. For the bottom tier I hand drew some swathes onto a piece of paper that I then traced onto the cake and used that as a guide line. After piping on the pearls I left them to dry and then painted then with edible lustre to give them the pretty pearlised sheen.


Friday, 3 January 2014

Nanna's Birthday Cake

Royal icing piped flowers cake


This is a cake I iced a few years ago for my Nanna's birthday. I was studying cake decorating at an evening class at the time and was keen to practice my skills with royal icing and this was certainly a big test! The design is from Peggy Porschen's Pretty Party Cakes book.

I made the flowers well in advance as they keep indefinitely. The pink flowers were the simplest to make. I used a petal nozzle to pipe a single petal onto the flower nail using a stiff peak royal icing, I then rotated the nail by 1/5th and piped another petal and so on. After the flower dried the yellow centres were then piped on top. The other flowers are all variations on the same theme. I particularly liked the violets which had two different colours of icing and used a black edible pen to accent the petals. After the cake was decorated the flowers were stuck down with more royal icing and pretty green leaves piped on randomly for added effect.

Royal icing piped flowers cake

Sunday, 10 February 2013

Jessica's Christening Cake


Christening cake with teddy bear

I was proud to be asked to bake a cake for our friends' baby's christening. They knew how they wanted the cake to look and gave me a couple of pictures to work from. This is the first time I've made something based on a design someone else has chosen and it was a nice challenge to work on something I wouldn't normally choose myself. I was tricky to just work from pictures without any instructions - but I think I did OK :)

Adjustable cake tin
I used my trusty adjustable cake tin that I've mentioned before. You can see in the picture to the left how it can be adjusted to make a cake of your preferred dimensions - in this case a whopping 9 inches! I was feeding a hungry bunch of Northerners after all!

Unfortunately I only have one of these tins, and even then only one would fit in our tiny oven, so I had to bake the two different layers separately. I haven't baked many large cakes in the oven of our house and didn't know there is a nasty hotspot and consequently the first tier didn't come out very evenly baked. I had to slice off quite a lot of cake to get it to sit flat so in the final cake there are only three layers instead of my usual four.

I started working on the decorations for this cake during the week so that they would be nice and dry by the time they were needed today. I used modelling paste to make the extremely cute teddy bear. He's essentially made of a ball for a body, another for a head and sausages for arms and legs. These modelling tools were great for shaping the ears, eyes and the cute seam down the middle of the head. Couldn't you just hug him? (Or bite his head off?!)

Cute pink teddy bear cake decoration with starsI also used modelling paste for the stars. I simply cut these out of paste and inserted some florists wire which is normally used for the stems of sugar flowers. Unsurprisingly modelling paste was also used for the building blocks and cut out 'JESSICA' letters.

The stars and hearts were all dusted with edible lustre to give them a nice pearlised sheen.

I'm well out of practice at royal icing lettering so I'm pleased with how well these letters came out. Next time I'll be sure that I mix up a colour that has more contrast to the icing so you can better see my handiwork.

The cake was extremely well received by all! I'm quite proud of it - even if I do say so myself :D

Now to relax and treat myself to a well deserved gin and tonic.

Sunday, 9 December 2012

It's the most wonderful time of the year

Mini gingerbread houses

Ok, these are a bit 'home style'. I was a bit preoccupied with mulling wine and singing along to Christmas tunes instead of concentrating on baking the impressive biscuits that these really deserved to be. A couple of them are a little burned high bake - but on the bright side the mulled wine was delicious!

I first saw these houses on my favourite blog Domestic Sluttery and had to make them IMMEDIATELY! What could possibly be better than tiny gingerbread houses with icing, silver balls and a good cup of tea? However my hopes of instant gratification were dashed when I discovered there was no sugar bling in Tesco Metro. Why no silver balls, Tesco? Humbug, I say! I reluctantly concluded that chocolate chips were not an adequate substitute for glitter and postponed the the bake until I could acquire the requisite decorations.

Mini gingerbread houses
The dough itself was fairly easy to make. I ended up chilling it overnight which made it a bit of a bugger to roll out. We had no trouble using some stiff royal icing to stick the different sections together. The doorways unfortunately closed over in the oven so they're not going to sit on a mug but they'll taste pretty good with a nice cup of tea (or mulled wine!) nonetheless.

Coming soon - stay tuned for Christmas cake 2012!

Sunday, 2 September 2012

Happy Birthday Anna!


It's been a busy year and I haven't had the chance to bake many cakes. I'm very rusty!

Happily it was my friend Anna's birthday this week so I was able to dig out all my cake decorating equipment and bake a cake. It was to be a big birthday barbecue so I needed to bake a large cake but unfortunately only had 6" cake boards available. Not a problem though - since we couldn't go wider - we went taller! 
Two tier purple blossom cake

This was my first two tier cake and I must confess I didn't do it properly with dowel rods but it was sufficiently sturdy for a barbecue.

Two tier purple blossom cake

I made four petal flowers from royal icing using the directions in Peggy's book. It's been a couple of years since I last made flowers so I found it quite tricky. For some reason I find four larger petals a lot harder than five smaller ones.

Sunday, 22 April 2012

Cherry Blossom

Japanese kimono cake with cherry blossom trees

I've recently been admiring the spring cherry blossoms in Greenwich which inspired me to upload this photo. I'm a big fan of Japanese style and really enjoyed designing this cake for my assessment in cake decorating (NCFE Certificate in Creative Craft, level 1). 

Tree decorations in progress For the assessment I used a cake dummy - a cake shaped block of polystyrene - which gave me time to work on the design over a number of days. The trees were piped from royal icing and whilst it was drying I worked in the realistic bark texture using a small brush.
The flowers were cut using a blossom cutter from pink flower paste and then shaped with a round icing tool on a foam pad. Before attaching to the cake I gave each blossom a light dusting of extra colour. I think this adds a pleasing variation between the individual flowers. The blossoms were painstakingly attached with dots of royal icing with an extra dot in the centre of every flower.

Japanese cherry blossom cake decoration

The model of a woman was inspired by a couple of Eastern designs I'd seen in Squires Kitchen cake decorating magazine. The torso and legs are one piece of mexican modelling paste which has been draped in a fabric-thin layer of paste for the kimono. The arms were modelled separately and attached with edible glue. I particularly liked using a sugarpaste extruder to create strands of black hair which were then draped around the head into a bun. 

Since creating this design I've had the pleasure of visiting Japan. It's a really wonderful place that I highly recommend visiting.

Wednesday, 21 March 2012

Cakes on a plane

Pink patchwork decorated cake

Last week I made a Patchwork cake based on the design in Sugarcraft 3 as a surprise for my Mother-in-law's birthday.

I've been wanting to bake this for a while. The design uses the Patchwork Squares cutters to cut and emboss the patchwork design out of stencil paste. I really like the texture and femininity of the cake.

I was running short of time to finish this before our flight to Scotland, but next time I'd like to try dusting parts of the design to add a bit of colour variety. We were very pleased that the cake made it from Greenwich to Glasgow unscathed!

Looking forward to trying some more needlework and fabric designs :)